Things You\’ll Need
-
Duct tape in light grey, black and white
-
Painter\’s tape in blue
-
Painter\’s tape in magenta
-
3/4 inch masking tape
-
Head-size round object to trace
-
Round 12 inch diameter storage basket
-
3 8×11 inch sheets of yellow craft foam
-
4 8×11 inch sheets of black craft foam
-
3 18×24 inch sheets black paper
-
Black permanent pen
-
Ball point pen
-
Scissors
-
24 inch ruler
-
Hot glue gun
-
White glue
-
X-acto knife
-
Square box (14×14 inches cube for a 3 year old sized costume)
-
2 pencils
-
2 cans of Pringles
-
Wax or Parchement Paper
-
Bubble wrap
 Wyldstyle Costume Image Credit: Wyldstyle Costume
Now here\’s a Lego lady worth rooting for: she\’s smart, sassy, a Master Builder, and dating Batman to boot! With this DIY costume, your little girl is sure to save the world.
Video of the Day
Wyldstyle Head
Step 1
 Shorten your basket. Image Credit: Wyldstyle Head Step 1
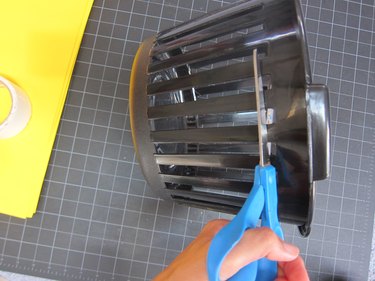
Take your 12 inch storage basket and cut off the rigid rim.
Step 2
 Tape basket so it doesn\’t flare. Image Credit: Wyldstyle Head Step 2
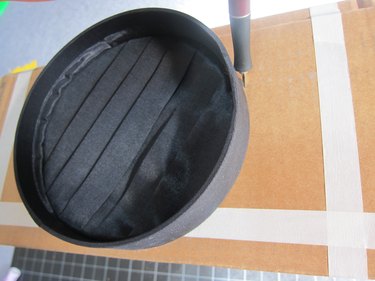
To create the face, remove 3 of the slats (or 3 inches, total, should your basket have tighter slats), from the base, creating an empty space. Tape the sides of the basket up top together so they don\’t flare out.
Step 3
 Cover the basket with foam. Image Credit: Wyldstyle Head Step 3
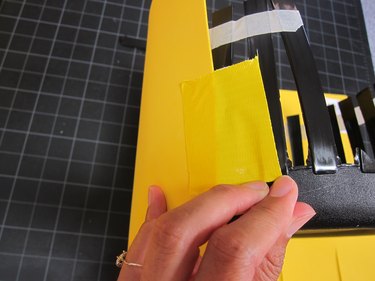
Cover the exterior of the basket in yellow craft foam, leaving it so it hangs two inches over the top and below the bottom of the basket. Tape another piece overlapping so the whole basket is covered in diameter.
Step 4
 Taper foam ends. Image Credit: Wyldstyle Head Step 4
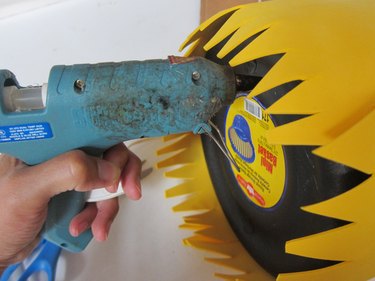
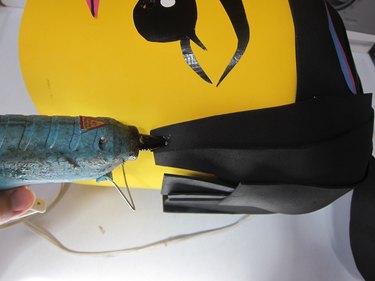
Cut the bottom of the sheet into tapered triangles. Hot glue the triangles to the base of the basket. This will prevent the foam from overlapping and getting lumpy.
Step 5
 Add tape features. Image Credit: Wyldstyle Head Step 5
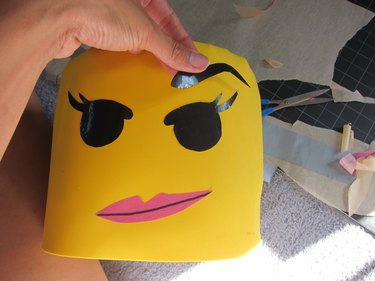
Tape duct tape to parchment paper and cut out features for the face. Remove the parchment paper from the back of the duct tape and apply features to your LEGO face. Make sure the eyes line up with the removed slats and also fall where the person who will be wearing the costume\’s eyes are.
Step 6
 Cut circles out. Image Credit: Wyldstyle Head Step 6
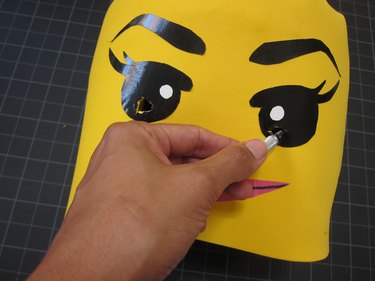
Using an X-acto knife, cut out little circles in the middle of the eyes. Use a permanent pen to color the yellow foam rim black.
Step 7
 Wrap the head with bubble wrap. Image Credit: Wyldstyle Head Step 7
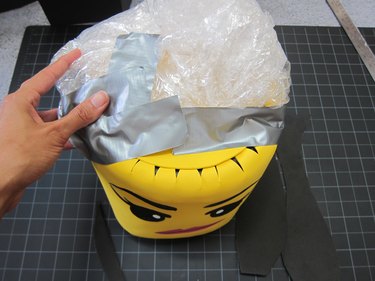
Wrap the top and back sides of the head with a layer of bubble wrap. Duct tape in place.
Step 8
 Add a hairdo. Image Credit: Wyldstyle Head Step 8
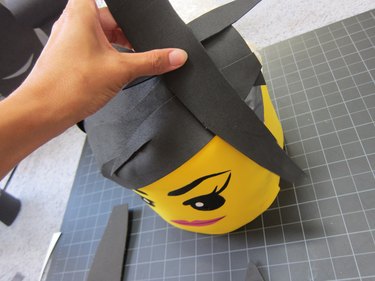
Cut the black foam sheets into wavy strips, remove the backing and adhere over the bubble wrap in hairdo-like strips.
Step 9
 Make a ponytail. Image Credit: Wyldstyle Head Step 9
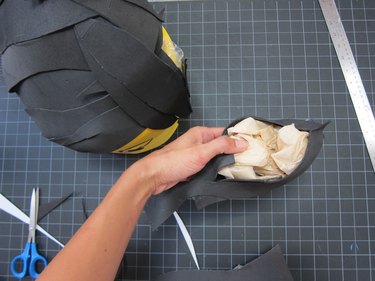
Make a ponytail by cutting 5 pieces of black foam into 6 inch long oval shapes. Make one or two have a two inch tail. Stick them together to create a pod and stuff with some of your wax paper.
Step 10
 Attach the ponytail. Image Credit: Wyldstyle Head Step 10
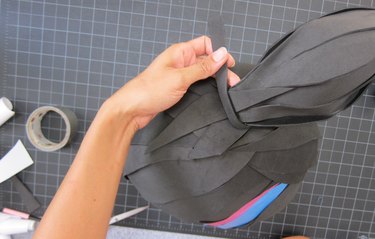
Stick the two sticky sides of the two longer pieces of the pod to the top of the head. Wrap with a thin strip of foam to prop the ponytail up a little bit.
Step 11
 Hot glue the hair down. Image Credit: Wyldstyle Head Step 11
Hot glue any pieces of foam that stick up down in the right place. Add two 10 inch pieces of magenta and blue tape to parchment paper, cut into \”highlight\” shapes and tape, and glue if necessary, to the front of Wyldstyle\’s hair-do.
Wyldstyle LEGO Body
Step 1
 Cut away flaps. Image Credit: Wyldstyle Body Step 1
Using scissors, remove the top four flaps from the top of your box.
Step 2
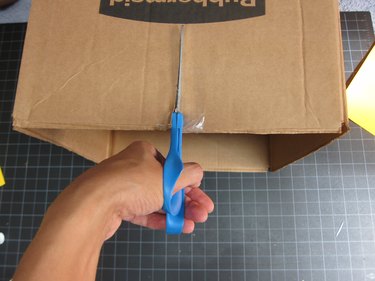 Cut box in half width-wise. Image Credit: Wyldstyle Body Step 2
Cut box in exactly half width-wise.
Step 3
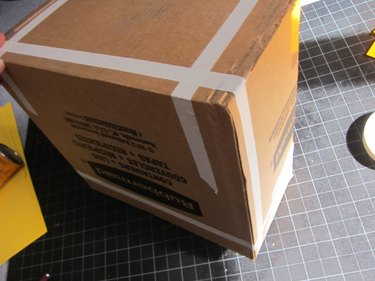 Tape pieces of box together. Image Credit: Wyldstyle Body Step 3
Tape the two halves together to make a rectangular 14 inch x 7 inch box with an open bottom. This size will fit a 3-to-4 year old. Adjust accordingly for a bigger body.
Step 4
 Make a hole for the head. Image Credit: Wyldstyle Body Step 4
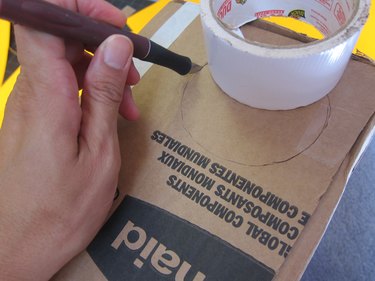
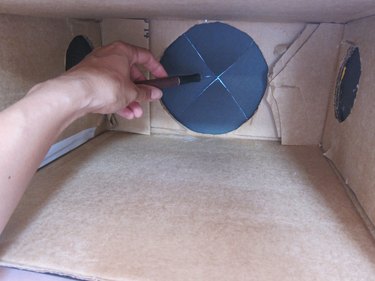
Using an X-acto knife and a 7 inch circle template, cut a hole in the top center of the box. This will be where the head will come through.
Step 5
 Make holes for the arms. Image Credit: Wyldstyle Body Step 5
Using an X-acto knife and one of your rolls of duct tape as a circle template, cut two holes in the sides of the box. This will be where the arms will come through.
Step 6
 Add paper to box. Image Credit: Wyldstyle Body Step 6
Cut two pieces of black paper to cover the front of each side of the box, flaring two inches on either side at the bottom. One should be long enough to wrap over the top of the box. The other should be long enough to overlap the top of the first sheet slightly. Apply thin ribbons of white glue to the paper on each side of the box. Stick paper to the box.
Step 7
 Cut away paper to reveal holes. Image Credit: Wyldstyle Body Step 7
Cover side rectangles with black paper as well. Cut holes out of paper with an X-acto knife.
Step 8
 Add chest and \”hoodie\”. Image Credit: Wyldstyle Body Step 8
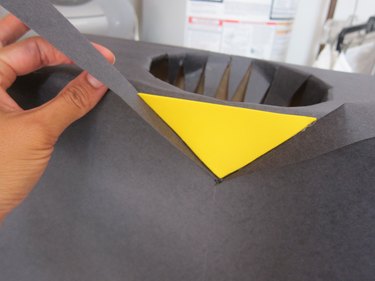
Cut a triangular piece of yellow foam. Hot glue in place. Make two 14 inch paper folded triangles of black paper. Starting at the point meeting the bottom of the triangle, hot glue one folded edge to the bottom side of the triangle. Loop these around the back side of the box and hot glue them overlapping to the back of the box. These will be the \”hoodie\”.
Step 9
 Add graffiti. Image Credit: Wyldstyle Body Step 9
Use a layer of magenta tape as a base and create the grafitti pattern like that on Wyldstyle\’s sweatshirt. Follow this up with blue painter\’s tape.
Step 10
 Create a zipper from duct tape. Image Credit: Wyldstyle Body Step 10
Halve a 12 inch piece of duct tape and tape it to a piece of wax paper. Cut it into triangles. Add these triangles in a line down the middle of the body box.
Step 11
 Add graffiti to a sleeve. Image Credit: Wyldstyle Body Step 11
Take a black long-sleeved shirt and add tape \”graffiti\” to the right sleeve.
Wyldstyle Legs
Step 1
 Add bumps to legs. Image Credit: Wyldstyle Legs Step 1
Cut two pieces of cardboard that measure the same width of the front of the \”body\” when they are next to each other and are the length of the costume wearer\’s actual legs. I used two of the flaps of the square box. Cut a Pringles container the width of one of them, and cut the container in half, taping each half to each side of the top of the \”leg\”.
Step 2
 Add sides of legs. Image Credit: LEGO Legs Step 2
Add the second piece of cardboard the same size adjacent to the first with duct tape.
Step 3
 Cut black semi-circles. Image Credit: Wyldstyle Legs Step 3
Use the top of your Pringles cans, trace 4 semi-circles.
Step 4
 Add black paper to bumps. Image Credit: Wyldstyle Legs Step 4
Cover the bump and front of the leg with white glue and cover with black paper. Cover the side pieces of cardboard with black paper.
Step 5
 Add graffiti to pants. Image Credit: LeGO Legs Step 5
Add \”graffiti\” to the right pant leg. The \”pants\” are to be duct taped to the bottom of the box from the inside after the \”body\” is put on.
Wyldstyle Hands
Step 1
 Make hands. Image Credit: Wyldstyle Hands Step 1
Cut 5 inches off the top of a Pringles can. Notch out an inch piece then cut it into two 2 1/2 inch x 8 1/2 inch pieces.
Step 2
 Cover hands in black paper. Image Credit: Wyldstyle Hands Step 2
Cut a piece of black paper big enough to double over each round 5 inches x 8 1/2 inches. Hot glue it to your cardboard, folding over one edge.
Step 3
 Puncture hands and add a pencil. Image Credit: Wyldstyle Hands Step 3
Puncture the middle of the \”hand\” with your X-acto knife, insert a #2 pencil through the hole and hot glue a piece of paper to cover the eraser. This will keep the pencil in place.
Step 4
 Wyldstyle, ready to trick-or-treat. Image Credit: LEGO Wyldstyle
The finished Wyldstyle costume.